
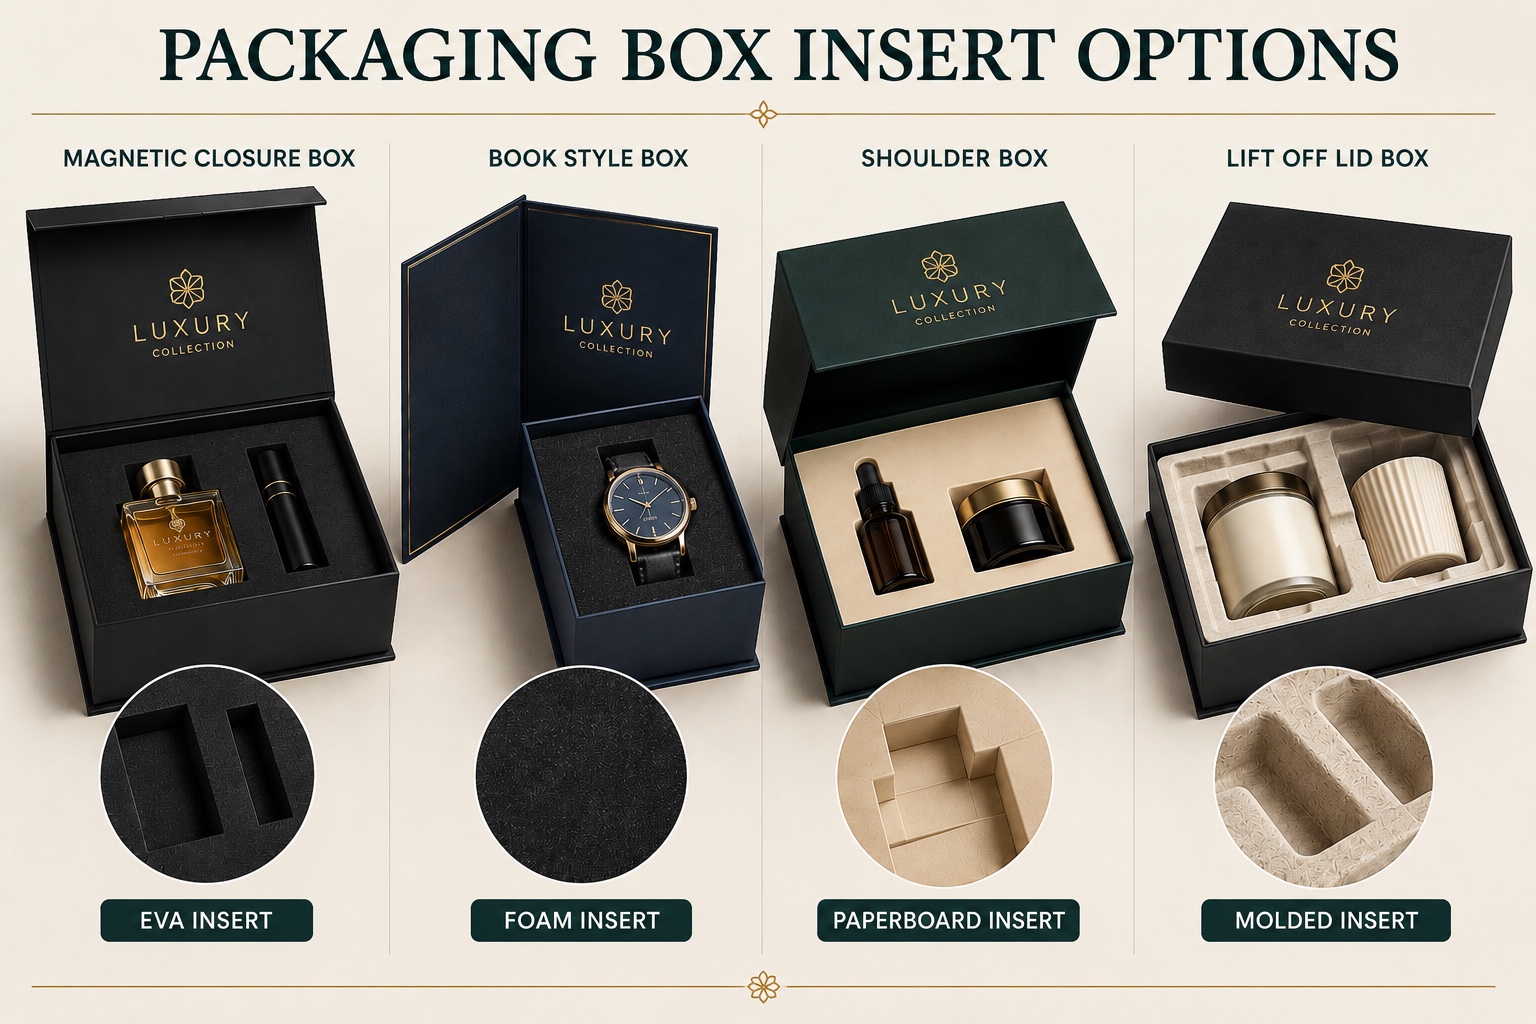
A packaging insert must do more than make a box look organized. It should locate the product, limit unwanted movement, protect sensitive areas and let the customer remove each item without frustration. This guide compares paperboard, foam, EVA and molded insert approaches so B2B buyers can prepare a clearer specification and evaluate samples around the real product.
What Does a Packaging Box Insert Need to Do?
A packaging box insert is an internal component that positions one or more products inside an outer box. Its job may include separating components, supporting weight, limiting rotation, protecting a decorated surface and controlling the order in which the contents are revealed. The required functions should be written down before a material is selected, because a visually attractive insert can still fail if the product moves, sits too deeply or is difficult to remove.
Begin by distinguishing retail presentation from distribution protection. An insert inside a presentation box may hold a bottle neatly, but the complete pack can still require an outer shipping carton and other protective measures. Likewise, a cushioning material does not correct an oversized box, an unstable product orientation or insufficient clearance around a fragile cap. Buyers reviewing the wider packaging boxes range should treat the outer structure, insert and shipping system as connected decisions.
A useful insert brief identifies contact surfaces, loading and removal direction, vulnerable parts, and whether the insert is primarily for location, presentation, cushioning or separation. Those priorities make comparisons meaningful.
Product fit and movement control
A cavity should control unwanted side-to-side and vertical movement without squeezing, marking or deforming the product. Fit depends on more than nominal length, width and height. Include caps, pumps, hinges, cords, protective sleeves and any accessories that change the occupied space. Rounded or tapered items may need support at more than one level to prevent rotation.
Clearance should be reviewed using the real product or an accurate physical model. Manufacturing variation in both the product and packaging also matters. A cavity based on one unusually small sample may be too tight for normal production, while excessive tolerance can allow movement. The approved fit therefore needs a practical allowance rather than a perfect digital outline alone.
Protection, presentation and removal
Protection and presentation often pull the design in different directions. A deep, close-fitting cavity may look secure but hide too much of the product or make it hard to grip. A shallow platform may display the product well but provide little control around a tall or top-heavy item. Finger notches, ribbon lifts, exposed shoulders and the direction of removal can balance these needs.
Observe how a customer approaches the pack. The first visible component, the space available for fingers and the force needed to remove the item all affect perceived quality. Product removal should not require pulling on a fragile closure, scraping a decorated surface or overturning the box.
Information to Collect Before Choosing an Insert
Material selection should follow a complete product review. Record finished dimensions and weight for every component, including accessories and protective bags. Note fragile areas, protrusions, sharp edges, delicate coatings and the product's center of gravity. Photographs from several angles are helpful, but physical samples reveal contact points that drawings can miss.
Clarify the sales and distribution context. A gift set packed at a contract facility has different assembly requirements from a single retail product loaded by hand. An ecommerce order may experience repeated handling beyond the presentation box, while an in-store package may prioritize display and compact replenishment. Do not assign unsupported performance expectations to the insert; define the handling route and decide what must be validated through sampling or any project-specific testing.
Identify which design elements are fixed and which remain adjustable. Early flexibility can prevent an unnecessarily large insert or complicated assembly.
- Finished dimensions and weight of every product component
- Fragile, protruding or surface-sensitive areas
- Required product orientation and opening sequence
- Packing location and expected assembly method
- Outer box structure and available internal dimensions
- Retail, gifting, promotional or ecommerce use
- Accessories, literature and protective bags included in the pack
- Sample review and project-specific validation requirements
Paperboard Inserts
Paperboard inserts are cut and creased into platforms, partitions, sleeves or folded supports. They can create cavities and levels while maintaining a paper-led visual language inside folding cartons or rigid presentation boxes. Printed surfaces may carry instructions, ingredient information or brand graphics when the layout and production method support them.
The structural result depends on board selection, grain direction, folds, locking tabs and the geometry of the loaded product. A simple folded platform may locate a lightweight item efficiently, while multiple products may need partitions or reinforced layers. Paperboard is not automatically suitable for every heavy, fragile or irregular product, and its performance should be evaluated in the complete pack.
Assembly deserves close attention. Flat paperboard parts can reduce incoming volume, but someone must fold, lock and place them correctly. Tabs that are hard to engage or panels that spring open can slow packing. Request a clear assembly sequence and test it with the people or equipment that will pack the final order. Buyers comparing folding carton packaging should include insert erection in the packing-line assessment rather than viewing the outer carton alone.
When paperboard may be considered
Paperboard may suit projects prioritizing graphic continuity, flat supply or an all-paper appearance. Confirm the actual board proposal, product fit and protection rather than relying on unsupported environmental claims.
Foam Inserts
Foam is an industry term covering several materials and constructions that can be cut, layered or shaped to create product cavities. It is frequently evaluated where a soft contact surface, close fit or cushioning behavior is important. Because different foam types can behave differently, buyers should not specify only the word foam and assume every quotation is equivalent.
The specification should identify the proposed material, visible color, surface finish, thickness or layered construction, cavity layout and any covering treatment. Density, hardness and cushioning performance must not be inferred from photographs or generic labels. If these properties matter, the supplier's actual proposal and an agreed validation method are needed for that project.
Foam can create a clean presentation, but deep cavities require removal access. Consider finger notches, exposed edges or a pull feature. Check whether the product surface is compatible with the proposed contact material and whether small accessories can migrate beneath a layer. The insert should arrive clean, accurately aligned and securely placed in the box.
Questions to ask about a foam proposal
Ask what material is quoted, how the cavity is produced, whether layers or adhesive are involved, and which surfaces remain visible. Confirm that the sample represents the proposed construction.
EVA Inserts
EVA is commonly discussed as a distinct insert option because it can provide a smooth, structured appearance and precisely shaped cavities. It may be considered for presentation packs containing bottles, devices, accessories or multi-item sets. As with other foams, the label EVA alone does not establish density, hardness, color consistency or protective performance.
Buyers should review the proposed EVA construction in a physical sample. Check cavity edges, corner radii, product contact, visible surfaces and the way the insert is secured inside the box. A cavity can match a drawing yet still grip a cap, press against a pump or leave the main body loose. Product variation and removal clearance remain central to the design.
Do not assume that a specific EVA grade, test result or environmental attribute is available unless it is documented for the project. The sourcing conversation should stay focused on the proposed material, fit, appearance and validation requirements. A black magnetic cosmetic gift box offers a useful context for discussing a dark presentation insert, but its pictured construction should not be treated as proof of one material specification for every project.
Molded Inserts
Molded inserts are formed to create three-dimensional pockets, ribs or supports around a product. Industry options can include molded fiber, thermoformed plastics and other formed constructions, each with different tooling, appearance and functional considerations. A buyer should name the actual proposed material and process rather than treating molded as a single specification.
Three-dimensional form can help locate irregular products and organize accessories, but the design must account for draft, undercuts, wall geometry, flange areas and the way the insert sits in the outer box. These constraints affect cavity shape and product removal. The visible texture and edge treatment should also match the intended presentation.
Tooling, minimum quantities, lead times and costs vary by supplier and process, so this guide does not assign standard figures. Ask for project-specific information only after dimensions, material direction and expected function are clear. Do not state that MCH supplies a particular molded insert unless that capability has been confirmed for the live requirement.
Molded does not mean one material
Two molded-insert quotations may describe different materials and processes. Compare the documented material identity, sample appearance, tooling scope, tolerance and packing method.
Comparing Insert Materials for a Real Project
A useful comparison begins with the same product, outer box and functional brief. Paperboard may support flat supply and printed presentation; foam may be evaluated for soft contact or cushioning; EVA may be selected for a defined, smooth cavity appearance; and molded constructions may organize complex shapes. These are decision prompts, not universal performance rankings.
Score each proposal against product control, removal, visible appearance, assembly, incoming volume and compatibility with the outer box. Include the cost and operational effect of every component, but request actual commercial terms from the supplier rather than relying on generic online ranges. If a material is unfamiliar, ask for a clearly identified sample and written construction details.
The outer format changes the decision. A white perfume rigid box with a fitted insert demonstrates a tall presentation layout where cavity depth and bottle access matter. A rigid lid-and-base box with an insert shows a wider presentation format. Neither page defines a standard material or fit for another product; both help buyers identify the questions a sample must answer.
Insert material comparison checklist
Compare named materials and constructions, not broad labels. Document the same evaluation criteria for every option so aesthetic preference does not hide a fit or assembly problem.
- Product movement in every relevant direction
- Contact with fragile or decorated surfaces
- Cavity depth, finger access and removal force
- Visible color, texture, edges and joints
- Insert assembly and placement in the outer box
- Incoming volume and packing-line handling
- Material identification and sample consistency
- Compatibility with the complete distribution pack
Insert Depth, Finger Notches and Cavity Fit
Insert depth determines how much of the product is supported and how much remains visible. A cavity that is too shallow can allow tipping or expose a fragile area. One that is too deep can hide artwork and make removal difficult. The correct depth depends on geometry, center of gravity, presentation and the direction of handling.
Finger notches should be positioned where a user can grip a robust part of the product. They must be large enough to use but not so large that they release the item from necessary support. For paired products, mirrored notches may look balanced but can be awkward if the items have different shapes. Ribbon lifts can help in selected layouts, but their path, length and anchoring need sample review.
Check the cavity with production-representative products, not dimensions alone. A nominally rectangular bottle may have curved shoulders, a projecting label or a cap wider than the body. Review loading and removal several times and note any rubbing, rotation, lifting of the insert or damage to printed surfaces.
How the Insert Affects Box Size and Shipping
Insert layout can make the finished box much larger than the products require. Wide borders, excessive cavity spacing and unnecessary presentation depth add material and may reduce the number of packs that fit in an export carton. Begin with the product arrangement, then minimize unused space without compromising access or protection.
Rigid boxes normally retain their formed dimensions, while many cartons and paperboard inserts can be supplied flat. That distinction affects warehouse space, export-carton configuration and packing labor. The rigid boxes versus folding cartons guide explains how outer structure changes storage and freight volume; the insert must be included in that comparison.
A presentation box should not be assumed to provide complete shipping protection. Confirm how the packed box is placed in its distribution carton, whether surfaces need separation and how product movement is managed through the full system. Any formal testing should be specified for the real product, insert, box and route.
Sampling and Fit Review
Sampling should progress from fit to appearance. An early structural sample can confirm orientation, cavity geometry, insert depth, removal and box dimensions before decorative finishes are finalized. Later samples can evaluate color, print, wrap alignment and the visual relationship between the product and insert.
Send real products when practical and identify whether they represent normal production dimensions. Pack every component in the intended sequence. Lift, close and reopen the box; remove and replace the products; inspect contact surfaces; and note whether the insert shifts. If the pack will be assembled elsewhere, share the sample and instructions with that packing team.
For beauty sets, the cosmetic packaging boxes guide provides additional questions about bottles, pumps and multi-item presentation. A custom rigid candle box with a fitted circular insert also illustrates why vessel diameter, cavity opening and removal access must be reviewed together rather than copied from a generic box.
What to record during sample approval
Record the approved product version, orientation, material description, cavity dimensions, color, attachment and outer-box dimensions. Use marked photographs and controlled drawings so later changes do not rely on memory.
Packaging Insert RFQ Specification Checklist
An RFQ should allow suppliers to quote the same functional requirement. Provide product dimensions, weight, photographs and physical samples where possible. State the box structure, internal dimensions if fixed, product arrangement, desired opening sequence and which areas need protection. Explain where the pack will be assembled and whether the insert should arrive flat, formed or already placed.
If you have a material preference, state whether it is mandatory or open to alternatives. Ask each supplier to identify the proposed insert material and construction rather than responding with a generic description. Request a sample plan and describe the checks that matter to your team. Commercial details such as quantity, price, tooling and schedule must be confirmed for the actual proposal; this article does not provide standard values.
When the structure is still open, review both rigid box formats and folding carton options before locking the insert. The outer box and internal support should be developed together. A clear RFQ helps suppliers explain alternatives without turning an unverified industry option into a claimed MCH capability.
- Product drawings, dimensions, weight and physical samples
- Required orientation, cavity count and accessory positions
- Fragile surfaces and movement-control priorities
- Outer box structure and confirmed internal dimensions
- Preferred insert material or permission to recommend alternatives
- Cavity depth, finger notch and removal requirements
- Visible color, surface and branding requirements
- Assembly location and required delivery condition
- Sampling stages and fit-approval responsibilities
- Destination and complete distribution-pack expectations
Choose the Insert by Function, Then Confirm It by Sample
There is no single best packaging insert material. The right choice depends on the product, presentation, handling route, outer structure and packing operation. Paperboard, foam, EVA and molded inserts each raise different questions about fit, appearance, assembly and sourcing. A material name should begin the evaluation, not end it.
Define the functions first, compare identified constructions against one checklist and review samples with the real product. Document the approved complete pack and exclude unverified performance claims.
Related MCH resources
Frequently Asked Questions
What information is needed to design a packaging box insert?
Provide the real product or accurate dimensions, weight, photographs, fragile areas, accessories, required orientation, outer box details, packing method and removal expectations.
Is EVA the same as every foam packaging insert?
No. EVA is commonly discussed as a specific foam option, while foam is a broad term covering different materials and constructions. The proposed material and sample should be identified for each project.
Can paperboard inserts be used in rigid boxes?
Paperboard inserts may be considered in rigid boxes as well as folding cartons when their structure, fit, presentation and assembly suit the product. Suitability should be confirmed through samples.
How should buyers check insert fit?
Use production-representative products to review movement, contact points, cavity depth, finger access, loading and removal. Record the approved construction and dimensions after sample review.